Remote Site Access and Connectivity via Wireline
Apr 1, 2013 7:55 AM, By Doug Irwin, CPBE DRB AMD
The minute I leave a transmitter site I have a concern about remaining in contact with all the equipment that is running there. Having remote access to the site is very important for my peace of mind. There’s nothing worse (in our line of work) than having something bad happen at the transmitter site, and not being able to see exactly what it is. The ability to take action remotely is clearly just as important.
The business continues to evolve: I used to have one transmitter site to worry about. Now it’s a half-dozen. We all know that studios used to be occupied all the time — and that’s no longer the case. For that reason, having remote access to the studio site has become important as well. As the number of sites a typical Broadcast Engineer has to deal with increases, it’s plain to see that remote access has become an absolute necessity. That’s our topic this time around — specifically, via “wireline”. (Next month we’ll talk about wireless access to a site.)
When I say “wireline” access I mean more than just the ability to call up a site on the phone. For many years that was good enough — but it just isn’t any more. Sure, it’s great to able to talk on the phone — and dial-up access can provide for a great backup for more complicated systems. (“More complicated” means they need to be booted occasionally.) Dial-up only access is very, very limiting though.
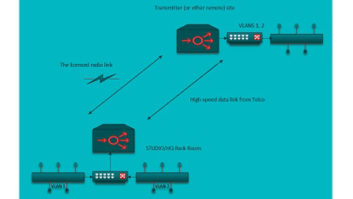
The nature of remote sites sometimes precludes them from easy wireline access, but for purposes of this article we need to assume that some sort of connectivity to the local telephone (or cable TV) company exists.
T1 Connectivity
If you know you can get a T1 from your local telco than more likely than not you are already using one for an STL. The question then becomes one of capacity. What data rate do you need up to the site? Are there any spare timeslots available on the current link, and if so, can they accommodate the data rated needed?

Harris Intraplex STL HD
The most common T1 STL in use is probably the Harris/Intraplex STL HD. This system was designed to accommodate IP transport for HD radio. At bare minimum, the transport for HD uses two timeslots (128kb/s) and as such won’t accommodate any other uses for data at the far end. On the other hand, if you find yourself with an Intraplex system, with spare timeslot capacity, you might want to consider a LAN extension by way of a pair of Harris DS64NC cards and a pair of MA427 interface cards. Each available timeslot adds 64kb/s to the total available across the link.
A pair of DS64NC cards makes up a LAN bridge, which is a simple means of making a Layer-2 (Ethernet) connection between two isolated locations. The network number will be the same on both sides of the bridge. Another advantage of the LAN bridge (aside from ease of setup) is that a certain amount of traffic regulation is afforded to your system; the bridge only passes frames from location to location if they truly need to pass.

Moseley SL9003T1
Another option is the Moseley SL9003T1. This device also allows the user to make use of part of the T1 bandwidth for the transmission of data via IP. Each end has an Ethernet interface and the system acts as a LAN bridge. There is, of course, a tradeoff between how much data you can use for audio transport and how much you can use for data transport, since the sum total is limited. As an example, with the SL9003T1 you can go up to 512kb/s while passing an uncompressed audio pair at a 32kHz sample rate.
– continued on page 2
Remote Site Access and Connectivity via Wireline
Apr 1, 2013 7:55 AM, By Doug Irwin, CPBE DRB AMD
An alternate way to use a T1 to connect two ends together via IP is to obtain a pair of routers with T1 interfaces. You can purchase new ones, of course; but there is a very active after-market for devices such as this. (Search for Cisco 2600s on eBay, and make sure they have T1 WIC. This will allow direct connection to telco.) In this case, you’ll be making a Layer-3 connection to the remote site, so the network numbers will be different on both ends. At the near end, you’ll use an Ethernet interface for the router. At the far end, you will also use the router’s Ethernet interface, but in that case (unlike your headquarters end) you’ll use that router as the gateway. Add a static route to the configuration of your gateway router back at headquarters, as well as the far-end router, so that IP traffic will flow in both directions.
DSL connectivity
Fortunately, DSL circuits have become available at more and more locations, and hopefully your remote location is one of those. There are several ways to make use of DSL, mainly to be discussed later in this article. Suffice it to say that you can often obtain download speeds nearly that (or greater) than T1 speeds in many cases. If symmetrical upload/download speed is an option from the provider, order that option. If you can order multiple IP addresses with the DSL access, you may want to consider that as well; as you will see later in this article, that isn’t really necessary.
Cable Modem
If the local cable TV company happens to provide service at your remote location, this can be a good option. Again, if there is an option for upload/download speed symmetry, order it. Multiple IP addresses may be an option; likely it isn’t worth the extra expense.
Metro Ethernet
If your near end and far end both have access to metro Ethernet, this could be a great option. Metro Ethernet will provide you with a Layer-2 connection between ends — just as if you had an Ethernet cable “running between” the two sites. This will facilitate much greater speeds than the other methods discussed, and you’ll be able to do things like add remote backup file servers. The far end will have a lot more capability than was previously possible; this capability may very well allow you to justify the extra expense involved.
The way in which you gain access to the transmitter site (or any remote site for that matter) depends upon whether or not a LAN extension is in use (via a point-to-point data circuit, or metroethernet) or alternatively the public Internet is in use (DSL or cable modem). In the case of the LAN extension, you’ll use either a remote desktop application, or VPN.
On the other hand, if you use the public Internet then you must deal with accessing multiple hosts and of course security issues that are necessitated by the public Internet. Earlier I mentioned the idea of getting multiple IP addresses from the service provider. Since public IP addresses are a finite commodity, your ISP is going to charge you for the privilege of having them. If you obtain (as an example) five IP addresses on your remote connection, you could simply place one device at each IP address. This simplifies the system in that, from your remote location, you’ll simply open a browser, looking at that IP. Naturally the device in question will require credentials so that there is at least a modicum of security. The downside is that your network size is limited on the far end. All is well till you go to add the sixth device.
There are two other approaches to accessing your new remote network. First, you could use a router on the far end, and configure port forwarding, so that multiple devices on the LAN side of the network can all be accessed remotely; secondly, you could set up VPN access, with the same goal. The advantages to these methods is that you only need one IP address at the far end, and your LAN size (though not unlimited) is going to be larger than you’re going to need in the foreseeable future. Let’s take a look at both approaches.
– continued on page 3
Remote Site Access and Connectivity via Wireline
Apr 1, 2013 7:55 AM, By Doug Irwin, CPBE DRB AMD

VPN setup at WKCR
I set up a remote transmitter site network for WKCR last year, using an inexpensive VPN router from Netgear known as the FVS-318G. At first this may sound a little difficult; but in reality, it wasn’t hard at all. If you opt for this method, by all means read the manual first (at least once) and have the VPN router in front of you the first time to configure it. The reason is probably pretty obvious — if you make a mistake you can always “boot” the router to get back to the factory defaults. (If at first you don’t succeed�try, try again. You know how that goes.)
Now in the example I’m pointing out, the network has seven hosts:
� The VPN router itself, as the gateway
� A Nautel Exporter
� A Nautel Importer
� A Nautel VS2.5
� A Nautel VS-HD
� An Audemat Mini-control Silver (remote control)
� An IP codec, which is the HD2 source.
The FVS318G is set up with a VPN policy that lets you connect remotely assuming you have the VPN client with the correct configuration. Without the VPN client, you won’t be able to see the network. There are two ways to connect to this router: Via the public interface; or, if you are at the remote site, by plugging in to the remaining port and setting the local computer for dhcp. (No VPN client needed in this case.)
There are several configurations on the VPN router to be done. Like any device that faces the Internet, you’ll need the IP address given by the ISP, along with the gateway and subnet mask. Once you set that, you’ll need to configure the LAN network number and subnet mask and the gateway address. Since this is a VPN router, you have two other configs to do: the IKE Policy and the VPN policy. In configuring this router, I used a lot of defaults for the IKE policy as well as the VPN policy, which makes the configuration pretty easy. Look at Figure 1. This is the IKE policy configuration page. There were only three things to configure: the remote and local identifiers, and the pre-shared key. I used factory defaults for the rest. Take a look at Figure 2 now. I had two things to enter — one in the “general” window, and one in the ‘traffic selection” window.

Figure 1. Click to enlarge.

Figure 2.Click to enlarge.
Of course that’s only half of the story. You have to have the VPN client from Netgear on your remote computer, and when you get that, it needs to be configured correctly. There are five separate places for configurations, though some are left blank. I’m including them anyway.
Phase 1 (authentication)
P1 Advanced
Phase 2 (IPSec configuration)
P2 advanced
Scripts
I would recommend for starters configuring your VPN client exactly as I describe to get going. This isn’t mean to be a primer, but I do want to demonstrate that the configurations aren’t hard.
For phase 1 (authentication) see Figure 3. You need the address of the public interface of the remote VPN router, obviously. You also need the pre-shared key. The other settings match the factory defaults described earlier. For P1 advanced, see Figure 4; you’ll need the remote and local identifiers. For Phase 2 (IPsec), see Figure 5. Here you need to know the remote LAN network number and subnet mask. Other configurations remained as the factory defaults.

Figure 3

Figure 4

Figure 5
– continued on page 4
Remote Site Access and Connectivity via Wireline
Apr 1, 2013 7:55 AM, By Doug Irwin, CPBE DRB AMD
After the configurations are done, you’ll tell the client software to open the VPN tunnel. Once you have it working, you’ll then connect to hosts on the far end by referring to them with their remote network addresses. Say for example my Nautel VS2.5 was given an address on the remote LAN of 192.168.1.100. When I open a browser on my client machine, I would use that address.
There is another approach to the same problem of having multiple hosts on the private side of a DSL or cable modem, and that’s by using port translation. (Thanks to Dennis Sloatman of CCLA for showing me this one.) In this example we’ll look at a simple D-Link EBR 2310, using its feature called “virtual server.”
First though let’s review the problem at hand. Say you have a remote Internet connection with a cable or DSL modem (with router functions). Your ISP has given you one IP address. You, of course, have more than one device to install on the private side of that router; and, to make matter worse, each of those devices expects to see requests coming in for port 80. You can use the VPN approach that I described already, or you can use port translation, to be described below.

Figure 6. Click to enlarge.
After the device is attached to its Internet connection, you of course have a little bit of configuring to take care of. You’ll select the “advanced” tab next. See Figure 6. This shows a typical configuration for “virtual server” on this D-Link. Here are the instructions previously given to this router:
The KVVS Wi-fi modem is accessed remotely by sending messages to the public IP, requesting port 9066. When the router receives these packets, they translated for the private side, and sent to the host at address 192.168.252.50, port 80.
The KVVS webcam is accessed remotely by sending messages to the public IP, requesting port 1024. When the router receives these packets, they’re translated for the private side, sent to the host at address 192.168.252.40, port 80 (again).
There is a Barix Exstreamer that can be accessed remotely by sending messages to the public IP, requesting port 9152. The D-link recognizes these packets, and translates them for the private side, sending them to the host at address 192.168.252.60, using port 80 yet again.
You can go on and on with this, adding practically as many hosts as you want. The limit likely has more to do with the link’s connection speed than anything else. I should note that the port numbers configured for the public side are random.
Often times I feel like I need to be in more than one place at the same time. Clearly I can only stand in front of one rack at a time; but with reliable, fast remote access, I can virtually be in many places at the same time. It makes my job easier, as it will yours. Knowing what is going on at all those remote sites — or at least being able to figure it out fast, does give me some peace of mind, and some satisfaction in that I feel everything is under control.
Irwin is RF engineer/project manager for Clear Channel Los Angeles. Contact him at [email protected].
April 2013
Remote access, inside Emmis Terre Haute, Field Reports on the Rode Reporter and Belar FMCS-1, working with Corian and more products at the 2013 NAB Show….