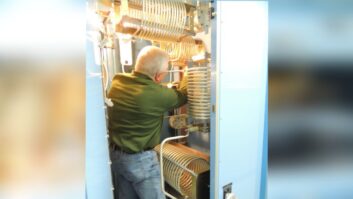
(click thumbnail)Fig. 1: A home-brew broadcast transmitter in Ecuador. “Home-brew” devices seem to catch an engineer’s eye. I don’t know if it’s the ingenuity aspect, the construction time involved or the thrill of doing it yourself.
Younger engineers missed out on the Heathkit era, when a thick catalog from that company offered a variety of electronic kits you could build (check out www.heathkit-museum.com).
John Schneider, formerly BE sales manager for the Latin Americas, sent in Fig. 1. It’s a picture of a home-brew 1 kW AM transmitter that Luis Silva sent to him from Quito, Ecuador. Obviously the “designer” had seen a Fritz Bauer transmitter!
Bauer metered everything, and manufactured one of the easiest tube transmitters to troubleshoot because of all that metering. The rigs were easiest to repair, too, since all the parts were common everyday components you could pick up at any electronics supplier.
According to John, this transmitter is still on the air! John is now manager of broadcast business development for Latin America at iBiquity Digital. He can be reached at [email protected].
Oh, to have the time to build something like this.
Over the years, one of the most amazing things to me is how forgiving electronic circuits are. Poor solder joints, under-rated parts, inadequate cooling — and the circuit still works.
Sometimes, home-brew can be used in modern settings, as we’ll see. Meantime, thank you John for this reminder of our collective humble beginnings.
I’m sure every reader remembers something he or she designed and built. For me, it was an overload indicator panel for an RCA transmitter. Pretty colored incandescent lamps arranged on a rack panel to indicate specific overload conditions.
I had the fortune to be at the station when the old rig was decommissioned and was given the panel as a souvenir. One look at the solder job I’d done 20 years earlier, and I whisked it away to my car’s trunk. I couldn’t believe how sloppy. But it worked, and the chief engineer at the time installed it, despite my feeble attempts at soldering. We all have to start learning somewhere.
* * *
(click thumbnail)Fig. 2: A few bulbs, wood and wire make up this home-brew dummy load, used to load-test uninterruptible power suppliers.
Home-brew circuits don’t have to be fancy, either. Sometimes the simpler the design, the more useful they are.
Sunbury Broadcasting’s Harry Bingaman uses the small- and medium-sized Tripp Lite UPS units, like the Internet 500U (a 300 watt unit) for his critical studio and rack equipment. They are small, relatively inexpensive workhorses. For his servers, Harry uses two Tripp Lite Smart Pro 500 rack-mount UPS systems. These handle things well until the emergency gen set comes online.
Current Tripp Lite units can be found at www.tripplite.com. Type INTERNET550U, SMART500RT1U and SMART1000RM1U into the Search field.
The smaller units are used in offices. The larger models are rack mount, and can be purchased with a NIC card that comes with free software. This feature permits control and monitoring of the UPS, and on some models, an e-mail warning if problems develop.
As a part of any good backup power system, the UPS batteries need periodic replacement. Harry came up with a home-brew UPS dummy load, which he uses to test each UPS under load. His design scheme is one that will make you smile; it’s shown in Fig. 2.
Harry took a piece of lumber and mounted 110 VAC light sockets on it, connecting them in parallel. The sockets are spread far enough apart that the higher wattage 250 W “flood” light bulbs can be screwed into two of the sockets; 100 W bulbs go in the last two sockets.
(click thumbnail)Fig. 3: The completed UPS load tester, with UPS and Fluke meter.
In his first iteration of this test load, Harry used plain old AC lamp sockets. He improved on the design by choosing the sockets that had an on/off pull chain. This way, he could add “load” by simply pulling the necessary chains to switch the bulbs into the circuit, rather than screwing and unscrewing bulbs — which get pretty hot during use!
As seen in Fig. 3, in addition to the sockets, Harry added an ammeter and some binding posts to connect his Fluke VOM and frequency meters. Harry also added a switch box that will remove AC power without having to pull the plug on the UPS. This makes for simple “power failure” simulations and rounds out the UPS testing before putting the units back on line.
Harry writes that he also made a “Big Bertha” model, using two 650 W tower bulbs with the Mogul bases. He hasn’t had the opportunity to test that one yet! As for batteries, Harry’s got a local electronic distributor that provides new batteries and recycles the old. For more information, head to www.moyerelectronics.com.
(click thumbnail)Fig. 4: Easy and smart: Identify the equipment served by your UPS. Harry also suggests you pick up a package of Quill color coding dots, 3/4 inch in diameter. He uses these to mark the date of battery replacement and purchase invoice number. Stick the dot on the unit, and now you have a visual indication of when the UPS was serviced. It also makes the information handy if you need warranty details for the battery.
* * *
If you’re doing UPS maintenance, one more thing to keep in mind, and it only takes a few minutes.
Follow the example of the engineers at New Hampshire Public Radio and label the UPS with the equipment it backs up. Seen in Fig. 4, this information can be critical in evaluating the equipment that is fed by a particular UPS.
Labeling even the smaller units can make troubleshooting easier in the panic that can ensue when these devices fail. Michael Saffell is the engineering manager at New Hampshire Public Radio.


