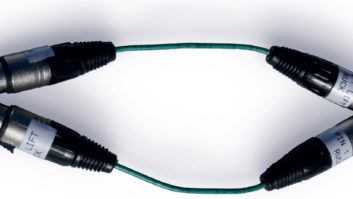
Fig. 1: One of MCM’s standard barrel 600-ohm 20 dB inline pads, along with the pad components that were removed. Buc Fitch tells us about a neat little adaptor that will be useful during remote season. It is a matching pad that adapts 600-ohm line-level signals to 150-ohm microphone level, while maintaining impedances. The heart of the adaptor is an “H” pad, so named because the resistive components form the letter “H.”
In this particular pad, impedance is transformed while dropping the audio level by 50 dB. The standard values of 300 ohms are on the two input legs, 75 ohms (such as video termination resistors, which are easy to get in 1 percent values) are in the output legs. A 1-ohm shunt resistor produces a theoretical 55 dB of voltage loss with a 600-ohm line in and 150-ohm mic impedance out.
This adaptor permits a line-level signal to be dropped low enough to feed a microphone input, without overdriving the input. This is an excellent pad value for +8 line levels in and a reasonable mic level out for typical mic inputs. An “H” pad is balanced by its nature, and usually works better than an unbalanced “T” pad.
The input and shunt resistors should be 1/2-watt, but the output resistors can be 1/4-watt. The pad should fit in an XLR-to-XLR barrel connector, as available from MCM (www.mcmelectronics.com). Buc used a 20 dB 600-ohm inline XLR pad, which he found on sale there for $2.99. He removed the MCM components and assembled the parts as described above. By using 1-percent resistors, Buc achieved good side-to-side balance and a nice match from line to mic level.
Buc offers these assembly tips:
De-solder the existing MCM pad from the female end first, then slide out the entire assembly from the male side.
Construct the new pad, working from the male end and culminating with some very flexible leads.
Slide this assembly back in from the male end. The leads for the female end should be just long enough to be able to solder them onto the female connector when pulled out of the barrel. Then push the female end into the barrel and close it up.
To prevent any solder joints on the pad from touching the metal wall of the barrel, cover the pad assembly with shrink wrap.
The calculated loss is nearly –55 dB. The total cost for one of these adaptors should not run much more than $6. Don’t forget to label the adaptor!
Here are the parts needed:
MCM parts
(1) dB 600-ohm inline XLR pad, part 555-17835 Digikey parts
(2) 75-ohm 1/2-watt 1-percent resistors, part CMF75.0HGCT
(2) 150-ohm 1/2-watt 1-percent resistors, part CMF150.0HFCT
(1) 1-ohm 1/2-watt 1-percent resistor, part CMF1.0HHCT
***
Speaking of your remote kit, make time now to remove everything from your kit, test the equipment for proper function, and inspect the cables and connectors. Add fresh batteries for the wireless mics and ensure you have all needed accessories to accompany your equipment. It’s better to come up short now than on the day of the remote!

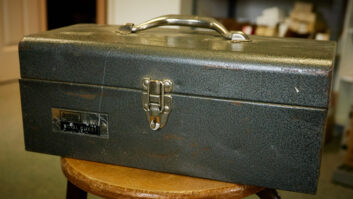
Fig. 2: The assembled parts, ready to be inserted in the MCM barrel connector. I’ve seen engineers prepare remote kits in empty rugged plastic tool kit boxes, available online or at the big-box hardware stores. The rugged plastic beats the worn-out cardboard box, and looks more professional, too.
A little preparation will save you plenty of grief later.
***
One of the biggest complaints I hear, especially from engineers new to the industry, is the lack of good broadcast engineering books.
The SBE is working hard to provide excellent technical webinars and classes, and many of them are on-demand. (Head to www.sbe.org for information.) But as for reference books, many are out of print and can be found only in used book stores. This void is particularly evident when it comes to books about antennas. Oh, you can find some books that are chock-full of equations — but what about practical uses?
Consultant Frank Hertel sent a link to a practical design e-book that engineers should find useful. The free, downloadable, printable book, “Practical Antenna Design,” was written by Elpidio Latorilla. It downloads as a PDF file. Find it at http://bit.ly/1irFrVh.
For engineers who need or want to build antennas without all the mathematical formulas, this book provides good explanations, illustrations and a parts list. A 200-page how-to-do-it manual, it covers ground plane, dipole and Yagi antennas, to name a few. A glossary of antenna terms is included. The illustrated designs are centered just above the FM band — between 140 to 150 MHz — but the designs can be adapted for other frequencies using conversion information at the back of the book.
Contribute to Workbench. You’ll help your fellow engineers and qualify for SBE recertification credit. Send Workbench tips to [email protected]. Fax to (603) 472-4944.
Author John Bisset has spent 44 years in the broadcast industry and is still learning. He handles West Coast sales for the Telos Alliance. He is SBE certified and is a past recipient of the SBE’s Educator of the Year Award.