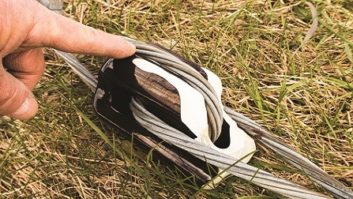
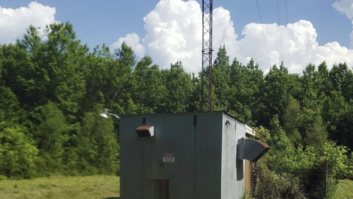
Fig. 1: Hey, MacGyver, what can you make of this?
Frank Hertel of Newman Kees RF Measurement spied a nearly empty Elmer’s Glue Stick and had a “MacGyver moment.” Can you guess his use?
* * *
Tim Walker’s porcelain insulator replacement adventure at WMVA(AM), described in the Jan. 4 Workbench, got the attention of Ben Hill.
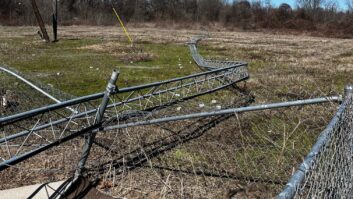
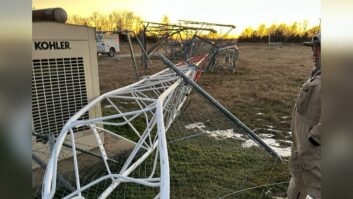
Ben is chief engineer of CBS Radio’s WIP(AM) in Philadelphia. He wrote, “I have the same flower pots!” And one of the insulators failed on his 300-foot Blaw-Knox tower about two years ago after a bad spring windstorm rocked the tower a bit. See the damage in Figs. 2 and 3.

Fig. 2: This base insulator was damaged when a tower twisted in the wind.

Fig. 3: Stresses fractured the other side of the insulator.
Skyline Tower Service’s Jim Graf and his team replaced the damaged insulator with a spare Ben had in stock. Ben writes that it was the scariest four hours of his career. But the replacement went well, and they sent the damaged insulator back to Lapp Insulators. Although the repair work took about six months, the insulator was returned to Ben in “like-new” condition.
Lapp Insulators LLC in LeRoy, N.Y., builds insulators for high-tension power lines. Ben says his job was “small potatoes” for them. Call (585) 768-6221.
If you own a tower using this type of insulator, it wouldn’t be a bad idea to search for a spare insulator to have on hand, just in case. With a six-month turnaround time on the repair, Ben’s spare insulator really saved the day — and his budget.
His experience demonstrates the necessity of thorough routine tower inspections, especially after storms.
* * *
New Hampshire Engineering Technician Chris Tyler sent in Fig. 4 after replacing a drive gear assembly in a copy machine. It was interesting to see how the teeth on the “old” gear assembly (at right in the photo) wore down.

Fig. 4: Check warranty on factory replacement parts. A lot of corners are cut these days.

Fig. 5: Disassemble the glue stick.
Also of note is Chris’ assessment of the factory replacement part. It had obviously been made more cheaply and was not as rugged as the original. Only time will prove how long it will last.
Whether you service the station’s office equipment or use an outside service specialist, check the warranty on parts being replaced.
* * *
Now to Frank Hertel’s glue stick.
As we disassemble the “stick,” shown in Fig. 5, it turns out that the Elmer’s product has a weirdly threaded inner plastic piston, that moves in and out but doesn’t rotate.
Frank decided to attach a small piece of copper tubing into the black glue well of the movable piston, seen in Fig. 6; he depended on the glue that remained in the well to hold the copper in place. Then he soldered a wire to this small copper tube.

Fig. 6: Add a short piece of copper tubing to the glue well (black plastic) of the movable piston.

Fig. 7: Add the outer copper tubing, which forms the other capacitor plate.
When the glue stick’s adjustment knob is turned, the small copper tube will move deeper into the glue stick’s body or further out of it. Meanwhile the attached wire moves in and out of the glue stick’s main body without rotating.
Then Frank used a larger piece of 3/4-inch copper tube and soldered a wire to it. He then slipped the 3/4-inch copper tube over the outer body of the glue stick. The result: aHertel MacGyver Glue Stick Piston Capacitor!
Frank threw it together in 15 minutes just to see if it would work, but it shows promise. Adjustment is smooth, as is the rate of capacitance change. As built, the Hertel MacGyver Glue Stick Piston Capacitor has a giganticrange of 10 pF to 12 pF! It needs to be optimized to make it useful and yield more range of capacitance; but it actually does something. Power handling capabilities, “Q” of the assembly … who knows?
How to mount it? Well that’s for another rainy day.

Fig. 8: Add wires to both pieces of tubing.

Fig. 9: The finished piston capacitor.
Frank did this just for fun. He sent the photos to a lot of his friends, with no leading information, just to see what response he would get. The feedback has made for good conversation. Frank also heard that he has too much time on his hands. That may be true, but then it only took him 15 minutes to “throw” it together — a coffee break for a lot of people. And yes, he did drink his coffee while he was building it.
Tell Workbench about your own MacGyver moment. Write to [email protected].
Contribute to Workbench. You’ll help your fellow engineers, and qualify for SBE recertification credit. Send Workbench tips to [email protected]. Fax to (603) 472-4944. Author John Bisset has spent 43 years in the broadcasting industry, and is still learning. He is SBE Certified and is a past recipient of the SBE’s Educator of the Year Award.