The RFEngineers Watch Dog receiver is used by many radio stations for local and remote off-air monitoring of audio, signal level, RDS and pilot. In this installment of our ongoing Raspberry Pi project series, Dan D’Andrea, RFEngineers’ “software guy,” details a project that employs a Pi to channel alerts from the receiver.
The Watch Dog receiver does not have an Ethernet port for sending out alerts over the internet. Instead, the receiver is configured, monitored and powered via its USB port. Thankfully, the USB port on the Watch Dog makes the receiver available as a serial device, which is easy to connect to in a variety of ways. We refer to this as its “Serial API” or “serial interface,” and it’s quite extensive. (Plenty of documentation can be found at http://www.RFEngineers.com/WD1.)
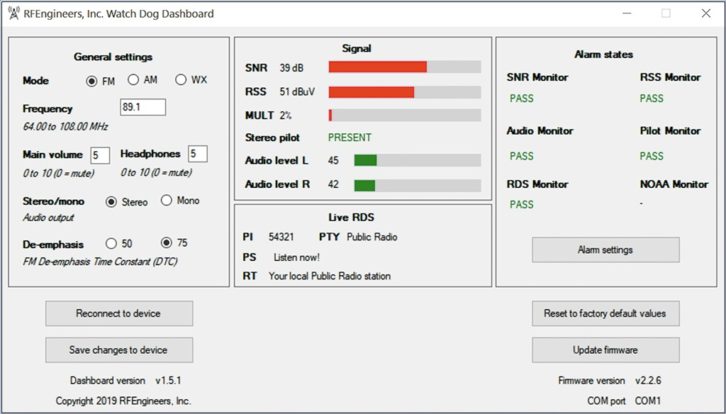
As one demonstration of what can be achieved with the Watch Dog’s serial interface, have a look at the RFEngineers Watch Dog Dashboard for Windows. The Watch Dog Dashboard is a free program that lets one easily configure and monitor the receiver and which is based entirely on the Watch Dog’s serial interface. See Fig. 1.
We began to wonder: How easy would it be to hook a Watch Dog receiver to a Raspberry Pi and have the Raspberry Pi continually monitor the Watch Dog’s status via the serial interface and send out an email any time an alarm condition is found? Perhaps a small Python program?
It turns out that the Watch Dog’s serial interface makes it ideally suited for automating with Python. We were able to write a simple Python program to monitor the Watch Dog and detect alarm conditions in less than 10 lines of code! We then extended the program to include email alerts.
This program is available for free and for you to adapt however you see fit in a public GitHub repository that we created: https://www.github.com/rfengineers/Watch-Dog-Python.
This article will go through the steps of setting up a Watch Dog receiver and a Raspberry Pi to work in conjunction as an Internet-enabled confidence monitor. It will use the AlarmEmail.py program referenced above and found on GitHub.
We used the following equipment:
- RFEngineers Watch Dog FM/AM/NOAA + RDS receiver, firmware v2.2.7
- Raspberry Pi 3 Model B
- 2.5A USB power supply
INITIAL SETUP
We used a Raspberry Pi 3 Model B with a fresh install of Raspbian OS, but just about any Raspberry Pi should do. We connected the Raspberry Pi to wall power using a 2.5A USB power supply. We then connected the Watch Dog to the Raspberry Pi via one of the Pi’s 4 main USB 2.0 connectors.
We chose to use a Raspberry Pi for this example but any PC, Mac or other computer that can run Python would be fine as well.
Note that you might ultimately gain better mileage using a powered USB hub to connect the Watch Dog to the Raspberry Pi, as we observed an Under-voltage detected! message in the system log file when first connecting the Watch Dog. The Raspberry Pi otherwise showed no problems powering the Watch Dog receiver.
FINDING THE WATCH DOG’S SERIAL PORT IN RASPBIAN
Run the following Linux command to determine on which port your Watch Dog is available:
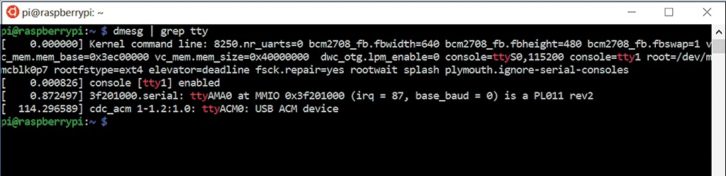
dmesg | grep tty
Look for a line containing a message like USB ACM device. Copy down the full tty value for a later step, e.g. ttyACM0 in our case. See Fig. 2.
Next, clone the GitHub repository or simply download the AlarmEmail.py program directly from here: https://github.com/rfengineers/Watch-Dog-Python.
Open up the AlarmEmail.py program in your favorite text editor and change the following parameters:
ALARM_LIMIT_SECS
This limits how often, in seconds, an alarm email will be sent. For instance, if set to 900 then the program will wait 15 minutes before sending another alarm email. Leave at the default value of 900 seconds if this works for you.
ALARM_POLL_SECS
This is how often the program will query the Watch Dog via its serial interface to get the latest alarms reading. Leaving this at the default value of 15 seconds should be fine for most uses.
WATCH_DOG_PORT
Put in the value that you found above in the “Finding the Watch Dog’s serial port in Raspbian” section. For example, if the value you found was “/dev/ttyACM1” then you would change this value to that. You can leave it at the default value if your Watch Dog showed up on the same port as ours.
CONFIGURING ALARMEMAIL.PY EMAIL SETTINGS
You will need to change several email-related settings, and possibly a few other email-related settings as well.
EMAIL_SUBJECT
You can leave this as it is if you are fine with the default message we chose. Otherwise change to suit your needs.
EMAIL_FROM
You will need to put your email address here, or the email address where you want the emails to come from.
EMAIL_PASSWORD
The password used to send email on your email server with your email address. I used my Gmail account, which required that I set up an App Password. More info on that here: https://support.google.com/accounts/answer/185833?hl=en.
EMAIL_TO
Where the email alerts should be sent.
EMAIL_SERVER_HOSTNAME
This is the hostname of the email server for the email address you are sending from. In my case, I was sending from my Gmail account, so I used smtp.gmail.com.
EMAIL_SERVER_PORT
The default port should be fine for most email servers. Otherwise you can change it here as needed.
RUNNING ALARMEMAIL.PY
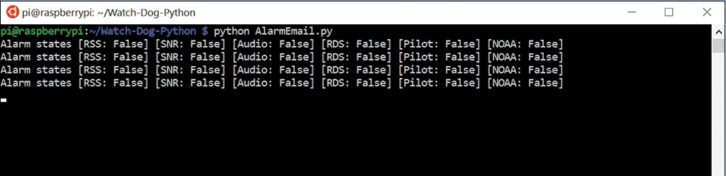
Fig. 3: AlarmEmail.py showing normal output with no alarms.Simply execute the following command to run the program: python AlarmEmail.py. See Fig. 3.
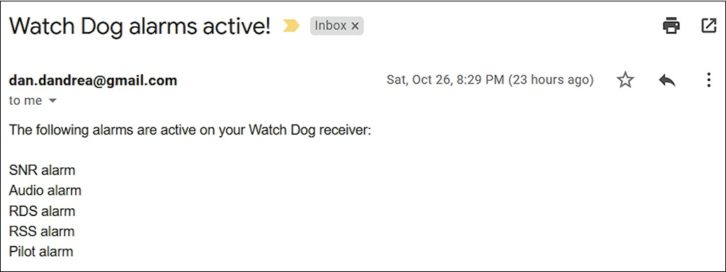
Pulling the antenna from our Watch Dog receiver was enough for us to generate several alarms. See Figs. 4 and 5.

ADVANCED: CONFIGURE ALARMEMAIL.PY FOR 24X7X365 FAIL-SAFE OPERATION
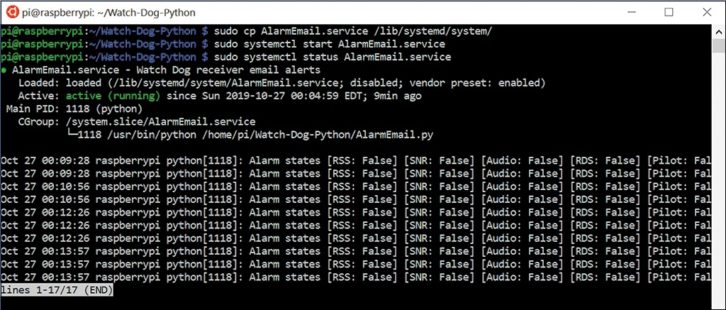
Fig. 6: Installing and starting the AlarmEmail.py systemd service.We want AlarmEmail.py to stay running, even if the Raspberry Pi temporarily loses power, is rebooted, or if the program ever crashes. We will accomplish this by running AlarmEmail.py as a Linux systemd service. Copy the AlarmEmail.service file from our GitHub repository to the /lib/systemd/system/ directory on the Raspberry Pi (see Fig. 6) and then issue two more commands to start the service:
sudo cp AlarmEmail.service /lib/systemd/system/
sudo systemctl enable AlarmEmail.service
sudo systemctl start AlarmEmail.service
You may also want to go ahead and reboot your Raspberry Pi now to verify that the service starts on boot.
CONCLUSION
Getting real-time email alerts from devices that don’t provide an Ethernet interface can be easily accomplished when you combine a Raspberry Pi or other computer and a bit of Python code. In this sense, the Raspberry Pi can be a great piece of “glue” for broadcast engineers.
This article will hopefully get you thinking about other automation opportunities for your broadcasting infrastructure. For example, using similar methods to those outlined above, a device like the Watch Dog receiver could easily be turned into a multi-station confidence monitor. Stay tuned, as we will likely be publishing just such an article in the near future.
Dan D’Andrea is an amateur radio operator, embedded systems enthusiast, Software-Defined Radio (SDR) hobbyist and professional software developer with 20 years of industry experience.
Send your RWEE story ideas to [email protected].
***
Read the previous Raspberry Pi article by Todd Dixon.