
Quite a few devices in my broadcast technical environment report alerting information by email. I and others have come to depend on these alerts as what my Ops Manager Eric Thomas refers to as “the rhythm of life” as far as the radio station is concerned: pattern changes, tower lights on, like that.
In many cases these alerts come from old-school email origination clients without the ability to authenticate themselves.
These devices need a mail transfer agent or MTA that simply trusts and forwards, something you would never expose to the open internet. In addition, providers like Gmail and vtext have a variety of ways to detect and reject emails that are suspicious. It’d be nice if my mail was accepted without complaint or being bounced.
Like many firms of size, our company email has been SaaS outsourced to Microsoft 365, which requires meaningful email client authentication. The various broadcast devices I need to serve would never play nicely with an MS or Gmail directly. The system I want must live inside the private address, protective firewall environment of the corporate IT department. And it would be nice if it didn’t cost much.
This article takes you through the build process step-by-step for a send-only MTA. All it does is route alerts from your various non-authenticating devices to real-world email providers on the outside. It will not and should not receive mail.
Almost Anything Will Work
To begin the project, I found an old mid-tower Dell box in the recycling bin at the office. So my core system was free. So far so good. My application is low stress and almost any x86 castoff will work.
I updated the BIOS using the Dell tool and installed a 250-gigabyte flash drive. It could easily have been smaller, but it’s what I had. The box already sported a mighty 4 gigabytes of RAM. When this machine shipped it had Windows 7 Pro on it. It still had the hologram license sticker. Vintage 2013, Intel Core i3. Old, unsuited for office use, but more than good enough for this.
The next step was to load Ubuntu Linux 20.04 Desktop on it. Download a copy at ubuntu.com. The 2.7 GB download is an .iso file for which you’ll use your favorite DVD burner application to copy onto writable disk media or a thumb drive. Connect the box to a network segment that provides DHCP. Boot your boneyard PC from the media you created and install. If you see the choice, elect the “minimal” install. This skips the usual office desktop applications which aren’t needed for this.
Write down your username and password choices (because if you don’t, you’ll be repeating the install). Then open a terminal with CTRL-ALT-T key combination and make your first use of “sudo” which means, more or less, “super user do.” From the terminal you can invoke administrative privileges this way, needed for installation and configuration.
From now on, things you are expected to type will be bold, like… sudo apt upgrade, which will install the latest patches in case they aren’t in the .iso you downloaded. You might as well start from the latest and greatest. Everything is lower-case and yes, case matters. Do not type any punctuation marks. Answer “Y” when prompted and watch the process.
Next is the utility for remote terminal access… sudo apt install ssh, giving you the same terminal functions by IP address using an app like putty.exe. Check from another machine to confirm access via SSH. You can discover the machine’s DHCP assigned address with… sudo ifconfig which will probably complain that you need net-tools. Might as well add those using… sudo apt install net-tools.
You now have a generic Ubuntu Linux install. And for the record, this could probably be a Raspberry Pi just as easily as the scrap pile Dell I am using.
DNS Stuff
The process beyond this point requires two prerequisites:
- You need a real registered host.domain hostname for your machine. Maybe you have a domain (and access to DNS records to assign its address and other attributes), or for a few bucks, just buy a name. If you buy one, make sure the name registrar provides DNS hosting. Most do for small operations like this.
- You’ll need an actual registered (static) IP address, at least initially, to facilitate the creation of certificates and mail encryption keys, required for delivery to name brand mail service providers. Don’t worry, your MTA will retreat to the safety of a private address (i.e., 10.x.x.x, 172.16.x.x, 192.168.x.x) inside a proxy once it’s set up. But to get the needed badge of validity, it must stand on the street corner of the real internet for a few minutes.
Start with the prerequisites by choosing a name for your newly configured box. I suggest mail.your_domain_name.com. Obviously, replace “your_domain_name” with your domain name. If you chose some other name during OS install, don’t panic. Use the inbuilt nano Linux text editor to change it: sudo nano /etc/hostname. Replace the text as appropriate with the new hostname. Do the same with /etc/hosts: sudo nano /etc/hosts.
Commands are along the bottom edge of the little nano text editor. CTRL-O to write, RETURN, then reboot.
Using the config tool provided by your domain DNS host, create an A record using the full hostname you gave the mail server. Associate it with the public, registered IP address you will use temporarily. Create an MX record pointing to the same hostname.
Keep in mind that DNS records may take a bit of time to propagate across the internet. I suggest leaving the records you create permanently in place, even though they won’t point to the eventual resulting system anymore. Some mail providers check to see if your hostname is a real box.
Now let’s install the MTA software: sudo apt install mailutils.
When you eventually get a choice dialogue box, choose “Internet Site,” which is the default. Then tab to OK. If it asks for a system mail name, it’s the same name you gave the server you are installing on.
To do what we want, Postfix will require a bit more configuration. Proceed to the text file /etc/postfix/main.cf: sudo nano /etc/postfix/main.cf.
You’ll need to locate a few lines of the file for editing, so this would be a good time to test out the CTRL-W command in nano to find, first: mydestination = $myhostname, your_domain_name, localhost.com, localhost.
Substitute your domain name as indicated. $myhostname is a variable set earlier in the file by a “myhostname =” statement. Might be good to check that info is correct, but Postfix usually gets this right on install.
Then find… mynetworks = and change it to read mynetworks = 10.0.0.0/8 172.16.0.0/12 192.168.0.0/16 to allow all the ranges of non-routable private addresses. These are the mail originating devices allowed to use your MTA for outbound messages.
The example config I show gets the whole universe of private IPv4 addresses. If you wish, you can restrict down to the individual device by using a complete address and /32 as the CIDR mask. Or anything in between. This is your gatekeeper. Let paranoia be your guide.
At this point save your changes to main.cf and restart postfix to allow the software to read the changes: sudo systemctl restart postfix.
Testing, testing…
Let’s test your server from the terminal (CTRL-ALT-T) with… echo “This is a test of email” | mail -s ” This is the subject line of the test” your_email_address.
Some receiving domains will probably accept the mail. Outlook.com (MS 365) might, but it’ll probably show up in junk or clutter. Vtext.com (Verizon email to text conversion) probably will as well and display in cellular text. Google Gmail won’t accept it at all; it’ll get bounced. So there is more to do. Time to enable encryption, certificate validation and transport layer security (TLS).
Meanwhile, take a look at the logging that Postfix provides, as it will tell you exactly what happened in the interaction with any outside service. Linux provides a nice utility to look at the last few lines of a log file and even monitor it as lines are added: sudo tail -f /var/log/mail.log (note: your install may name this log file differently, but it will be in the folder /var/log). Also notice that the -f argument makes the utility display new lines as they are appended in real time. You can have more than one terminal instance open at a time, allowing you to watch what happens with the gmails of the world in real time.
Next up is the authentication piece that real email services will be looking for from your MTA.
Let’s get the needed credentials from the free Let’s Encrypt folks. Consider making a contribution to their efforts. sudo apt install certbot. As always, press “Y.”
Then sudo ufw allow 80. This tells the UFW firewall to open a port for HTTP. The command should answer with confirmation that it opened the port. Certbot’s process will reach out and “Let’s Encrypt” will reach back over port 80 to confirm the host presence at the address claimed, using the DNS records you created. But certificate information doesn’t include IP address directly, so a later move to a private address inside the firewall shouldn’t break anything.
Now let’s create a certificate that identifies this server as within the domain you’ve placed it in and provide a public key to go with the private key that’ll be stored on this host. sudo certbot certonly –standalone –rsa-key-size 4096 –agree-tos –preferred-challenges http -d your_domain_name (those are double dashes, by the way).
When complete, you should see this:
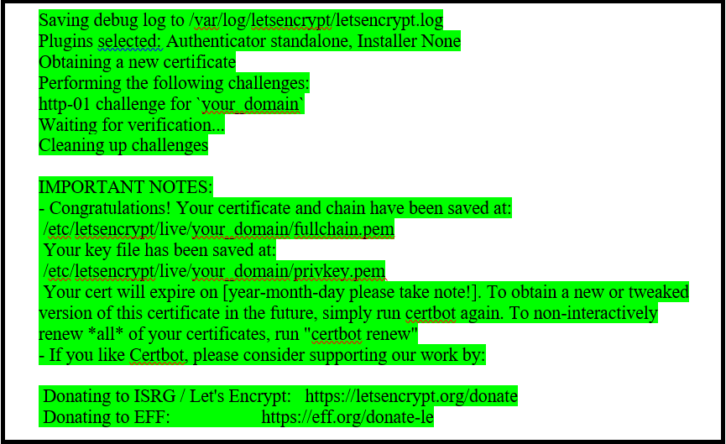
If it doesn’t work, check your DNS configuration, or maybe just wait a while and try again. When it completes, pay attention to certificate expiration.
Now let’s tell our server where the keys are kept. Back to the postfix config file we go:
sudo nano /etc/postfix/main.cf.
Under # TLS parameters find:
smtpd_tls_cert_file=/etc/ssl/certs/ssl-cert-snakeoil.pem
smtpd_tls_key_file=/etc/ssl/private/ssl-cert-snakeoil.key
and change it to:
smtpd_tls_cert_file=/etc/letsencrypt/live/your_domain_name/fullchain.pem
smtpd_tls_key_file=/etc/letsencrypt/live/your_domain_name/privkey.pem
Finally, to further satisfy Gmail, add the line: “always_add_missing_headers = yes”.
Save, exit nano then restart postfix: sudo systemctl restart postfix.
If all went as described (it should have), then you have a mail transfer agent. Any mails from your devices, pointed to the private address the server has, will be forwarded to whatever mail service is indicated.
Finally, you can disconnect from the public internet (the registered static IP), bring this server inside the firewall and give it a private address.
Use the desktop “settings” tool to change the IP. So long as port 25 is open through the firewall, you are all set. Just point your various reporting devices to that same private address and watch the alerts flow.
If it doesn’t work, check your DNS configuration or maybe just wait a while and try again. When it completes, pay attention to certificate expiration. In my case, using GoDaddy DNS, I had to assign the IP address to my machine that is associated with the your_domain_name DNS entry. Your DNS provider may work differently. The error messages that certbot sends are helpful for Googling.
Now let’s tell our server where the keys are kept. Back to the postfix config file we go.
# Raspberry Pi differences:
- Enable SSH terminal access using the raspi-config tool
- net-tools are already installed in the Raspi Lite .iso
- Use raspi-config to change the hostname
- mailutils does not include postfix when pulled from the raspi repositories. sudo apt install postfix
It doesn’t take a lot to create a functioning MTA out of equipment already on hand. Having that functionality will ensure that important status and warning messages get through, which will make the engineer’s job easier and provide for faster responses to anomalies.