Fig. 1: Use the free Open Office drawing program for panel identification. Perhaps you’ve used “wax” transfer lettering and symbols to label a front panel in a “do it yourself” project. Although that can produce good results, the process is time-consuming and tedious.
Frank Hertel of Newman-Kees Consulting offers a new approach to laying out and labeling a project’s front panel, all in one simple project.
On the computer, create a rectangle that represents the area of the panel on which your project’s controls and connectors will be mounted. Add the layout markings for drilling the mounting holes, as well as the lettering needed to identify each control.
Once you’ve identified and labeled the mounting holes, print the drawing to scale on a regular piece of paper. Next, tape the printed artwork to the project’s (blank) front panel.
With the artwork taped into place, use a spring-loaded center punch and mark each drill point. Then drill each hole to the size needed for each control or indicator. Frank recommends you make a border or artwork alignment mark on your front panel. This will make affixing the panel artwork easier, as it is pasted onto the surface of the front panel.

Fig. 2: With a pointed blade knife, cut the panel holes covered by the artwork. There are many types of specialty papers that have a metallic look. Choose a type that can be printed upon by inkjet or laser printers, or run through a copy machine. The paper used in Frank’s project was Wausau Creative Collection Specialty Cardstock, 8.5 x 11 inch, Royal Metallics Mix, 40 Count, 32 lbs.It is acid- and lignin-free, and it should hold up quite well. Alternately, you could use regular heavyweight paper.
Spray-on contact glue helped affix the final printed artwork to the project’s front panel. Apply the glue only to the front panel. This will assure an easier, less messy, application of the final printed artwork. Don’t use too much spray-on glue or your artwork will not lie down without bubbling.
Once the glue is applied, move quickly to place and align your final printed artwork with the holes you drilled in the panel.
After applying the printed artwork, lay the panel face-down on a flat surface to dry. After drying, you can spray a light protective coating, such as satin urethane varnish, on the artwork.
Once the protective coating has dried, use a fine-pointed-blade knife to excise the control hole openings. Cuts are shown in Fig. 2.
Caution: Do not try to rush the drying of the protective coating by baking it in the oven or blowing a fan on it. Drying too fast will cause the edges of the printed artwork to ripple and loosen from the panel.
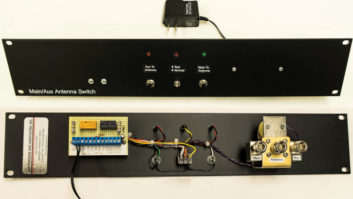
Fig. 3 shows the controls awaiting the finished front panel. Fig. 4 shows the completed project.

Fig. 3: Connectors and indicators await the finished front panel. Frank says the project was a learning process; his words of warning are a product of mistakes made along the way. You likely will find ways to refine this process further with your own hands-on experience.
Give it a try and dress up the look of your next project the easy way.
Contribute to Workbench. You’ll help your fellow engineers and qualify for SBE recertification credit. Send tips to [email protected]. Fax to (603) 472-4944.
John Bisset has spent 43 years in the broadcasting industry and is still learning. He is SBE certified and is a past recipient of the SBE’s Educator of the Year Award.

Fig. 4: Voilà, the finished product.