Many engineers are all too familiar with the task of changing switch lamps on consoles.
Over the years, we’ve seen improvements in console designs, the most recent being the use of LED replacement lamps. In one of the discussion threads on Dave Biondi’s [email protected], several engineers asked for information on these LED replacements. Milos Nemcik at KCPR – Cal Poly Radio suggested checking out the Web site www.ledtronics.com
The only drawback is cost; LED replacements haven’t quite gotten down to the price of incandescent lamps, but the cost is dropping.
As you select a replacement bulb, note the polarity of the circuit. The LEDs come in two polarities for the most common bulb replacements.
. . .
(click thumbnail)Fig. 1: Use heat shrink to cover the jaws of pliers or clamps and create a handy bulb extraction tool.
Jerry Mathis of LifeTalk Radio came up with a novel method of removing the wedge-base lamps used on the module on/off switches in Arrakis 12000 audio consoles.
Although the on/off switch bulbs aren’t too difficult to remove, the lamps on the TRR1 module are another story.
Jerry found a piece of cable jacket from a large-gauge microphone cable. The cable brand and stock number are unimportant. The inside diameter of the jacket will fit snugly over the lamp. Once placed over the lamp, the snug fit permits easy removal of the lamp.

. . .
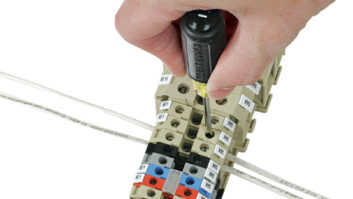
Bob Hughes and I have chased each other around stations here in Washington for too many years. Bob now works at the Pentagon, handling audio and video requirements for the Joint Chiefs of Staff. He’s got his share of illuminated switches, which require periodic bulb replacement.
We’ve all attempted to extract bulbs using a pair of long-nose pliers. The task is risky at best, because you usually wind up breaking the bulb, shorting something and having to clean up the mess to boot!
Bob’s solution can be seen in Figure 1. He outfitted a pair of hemostats (Kelly clamps) with two pieces of heat-shrink tubing. This modification provided two beneficial effects. First, the adhesion was increased. Then, the shrink tube offered a cushion on the “jaws” of the clamps, making them less likely to break the bulb.
(click thumbnail)Fig. 2: Inside an ATU, lightning has damaged a sampling toroid.
It won’t be long before AM engineers will be seeing sights like those of Figures 2 and 3 inside their ATU/ACU (antenna tuning unit/antenna coupling unit).
Direct strikes and Delta sampling toroids don’t always mix, as you can see in Figure 2.
In addition, the physical shock of the strike literally can shake a coil off its mounts. Figure 3 shows the cracked insulators as a result of the strike.
(click thumbnail)Fig. 3: Check for cracked or broken insulators supporting coils and other components in an ATU.
Ralph Winquist, P.E., suggests leaving a burning light bulb inside your coupling unit box. In cooler weather, the light keeps a more consistent temperature. In damp weather, the bulb reduces humidity.
If you are reworking your coupling network, Ralph recommends 5/16-inch refrigeration copper tubing for your connections – but the tubing needs to be sized according to power. Needless to say, the tubing diameter is much larger in 25 kW and 50 kW networks.
Corrosion where components join together is a common problem. To reduce corrosion, Ralph recommends wiping the joints with De-Ox manufactured by Ilsco, available through your electrical wholesaler.


. . .
One of the most frustrating problems for an engineer starting a new job or working at a newly purchased station is AC wiring. A variety of problems result from improper wiring.
As you do your due diligence, grab one of those AC polarity indicator plugs, available at most hardware or electric supply stores, and check the outlets.
Just as important is proper wiring of plugs connecting to equipment. Most manufacturers now use molded cords, but some pieces of equipment still require hand-wired plugs.
So for your “clip-and-save” file, here’s the scoop on plug wiring. Present-day plugs have silver, brass and green screws on the plug. The white AC wire is connected to the silver screw. The black (or hot) wire is connected to the brass screw, and the green ground wire is attached to the green “ground” screw.
Submissions for this column are encouraged, and qualify for SBE recertification credit. Fax your submission to (703) 323-8044, or send e-mail to[email protected]